


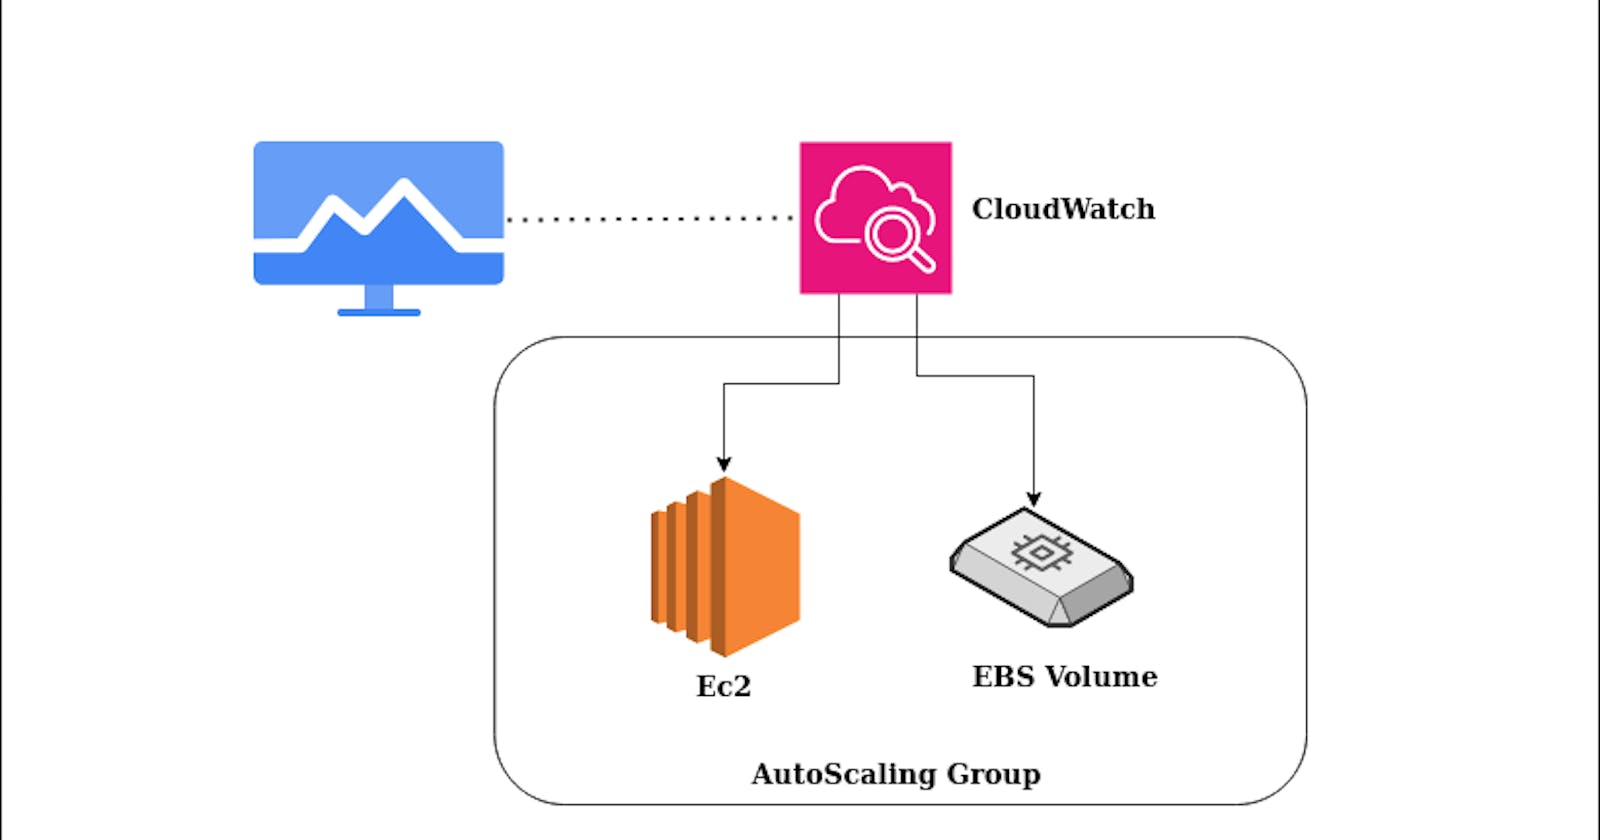
Monitoring AWS Auto Scaling server memory and disk metrics in Amazon CloudWatch involves installing and configuring the CloudWatch agent on your instances. Here's a step-by-step guide to help you achieve this:
Step 1: Prepare IAM Role
Create an IAM Role:
Open the AWS Management Console and navigate to the IAM (Identity and Access Management) service.
Create a new IAM role with the necessary permissions for CloudWatch. Attach the "CloudWatchAgentServerPolicy" policy to the role.
Step 2: Install CloudWatch Agent on Your Auto Scaling Instances
Connect to Your Instances:
- SSH into your EC2 instances that are part of your Auto Scaling Group.
Download and Install the CloudWatch Agent:
Download the CloudWatch agent on your instances:
  wget https://s3.amazonaws.com/amazoncloudwatch-agent/ubuntu/amd64/latest/amazon-cloudwatch-agent.deb
  sudo dpkg -i -E ./amazon-cloudwatch-agent.deb
Configure the CloudWatch Agent:
Edit a configuration file
sudo vi /opt/aws/amazon-cloudwatch-agent/bin/config.jsonfor the CloudWatch agent. You can use a sample configuration or create a custom one. Example configuration for both memory and disk metrics:(Make sure autoscaling group tag with Instance name)
  {
    "agent": {
      "metrics_collection_interval": 60,
      "run_as_user": "root"
    },
    "metrics": {
      "metrics_collected": {
        "mem": {
          "measurement": [
            "mem_used_percent"
          ]
        },
        "disk": {
          "measurement": [
            "used_percent"
          ],
          "resources": [
            "*"
          ]
        }
      },
      "append_dimensions": {
        "AutoScalingGroupName": "${aws:AutoScalingGroupName}"
      },
      "aggregation_dimensions": [
        [
          "AutoScalingGroupName"
        ]
      ]
    }
  }
Save this configuration to a file.
Start the CloudWatch Agent:
Start the CloudWatch agent with the configured file:
  sudo /opt/aws/amazon-cloudwatch-agent/bin/amazon-cloudwatch-agent-ctl -a append-config -m ec2 -c file:/path/to/cloudwatch-config.json -s
  sudo /opt/aws/amazon-cloudwatch-agent/bin/amazon-cloudwatch-agent-ctl -m ec2 -a status
Check the logs of CloudWatch Agent:
- If you encounter any issues during these steps, please check the CloudWatch Agent logs for more information:
cat /opt/aws/amazon-cloudwatch-agent/logs/amazon-cloudwatch-agent.log
Step 3: Verify Metrics in CloudWatch Console
Navigate to CloudWatch:
- Open the AWS Management Console and navigate to the CloudWatch service.
View Metrics:
In the CloudWatch console, go to "Metrics" and select "CWAgent" namespace.
Look for metrics related to memory and disk usage, such as "mem_used_percent" and "disk_used_percent" under "AutoscalingGroup" Section.
By following these steps, you can monitor memory and disk metrics on your AWS Auto Scaling instances using Amazon CloudWatch. Adapt the configuration based on your specific use case and metrics of interest